Thursday, December 27, 2012

Post-Christmas Prettifying

A belated merry Christmas to you, my readers, both of you. This month has not been great in terms of blog updates, but has been pretty good in terms of life happening and keeping me busy. We hosted Christmas for my family, so that was a self-inflicted whirlwind of planning and execution. If I had it to do over again, I might chill out on a few elements of the meal, but I had to put the kitchen through its paces, right?

We had prime rib at Eric's mom's house on Christmas Eve, so I searched for a non-beef idea for Christmas dinner at our place and found it in a pork crown. It's a crown! Of pork! This photo was taken just as I was realizing that I had neglected to read up on how to actually carve a pork crown. So that turned into a crude hack job, and then once everyone was served we realized that despite my use of a meat thermometer and the newfangled oven, some cuts were still a little too pink. So they went in the broiler for a few minutes and everyone was chill. Thanks to my wonderful family for making it no big deal.

My family went totally overboard on gifts, but I'm not complaining because we scored some awesome stuff for la casa. My brother and his girlfriend gave us this groovy retro clock for the kitchen. I hung it above the fireplace temporarily for this photo but have plans to move it once we get the room painted. (Soon! Stay tuned!)

I also had a comforter and duvet cover on my wishlist, which my parents treated us to. I'm trying to tone down some of the bolder colors in the bedroom to go better with the wall color and curtains, so the new duvet cover was a big piece of that. It was also nearly impossible to drag myself out of bed this morning, so I think that means the comforter is living up to its name. Next on the list for this room: a new bedskirt and rug. 

Eric, vying for the Indulgent Husband of the Year award, picked up a couple of new pieces of gravel art for me on eBay. They are perfectly ridiculous and I love them deeply. 

Also in that vein: a new cardboard moose trophy, also a gift from Eric. We had talked about finding some kind of vintage mount for the basement to really embrace the cabin-y feel, but it turns out those actually go for serious money. So the cardboard is more affordable and also conveys that it is indeed a joke. "It is indeed a joke" is basically my decorating mantra.  
Not a joke: Eric's collection of ticket stubs, which he's been accumulating since... forever. He'd actually been keeping them in a teeny box that had basically become a brick and was at full capacity, so my gift to him was this shadowbox. Now he can see his collection a little better and it becomes cool art. Also, it's top-loading instead of back- or front-loading like most shadowboxes, so he can slide open a little panel in the top and continue adding to the collection.
It was a dorkishly great Christmas! I really loved hosting and finally being able to hang out in the kitchen with people. I am overdue on posting a kitchen update but we are aiming to paint it within the next few days, so I'm going to save it until then and post a bunch of the new stuff all at once. A preview: I am writing this post from our lovely new desk! My cup runneth over. Merry Christmas again, gang. I hope your holidays were just what you wanted.


Wednesday, December 5, 2012

Installing a Never-MT for Maximum Soap Dispenser Optimization, Synergy, and Robustness

I just completed my first kitchen DIY, and it was only a few minutes ago but so far has NOT resulted in property damage, so, big score.

We got the okay to move stuff into most of the cabinets yesterday (we're leaving a few of them empty because they still need work in/around them) so I unpacked all of the dishes and pots and pans, and also WASHED DISHES IN THE KITCHEN SINK, which I never thought I would be so excited about. We've been using the laundry sink in the basement for the past month, and it was just... blech. Unpleasant. So I was actually really thrilled to use our beautimous new two-sided sink.

Never MT
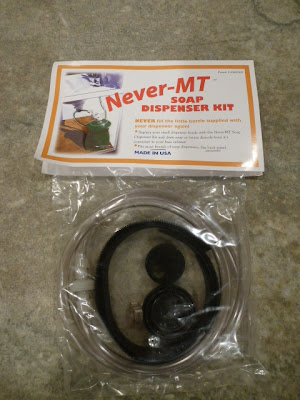
Now, I've mentioned the ladies of GardenWeb (I might be generalizing there, but yeah, they're mostly ladies) in a past I'm-stressed-out-about-the-kitchen post. There have been times when I've browsed those message boards and rolled my eyes at their dramas (glass house?), but there are also lots of good tips. That is where I learned about the Never-MT, which is a kit for a countertop soap dispenser that makes it so you don't have to futz with refilling the bottle. If you look really closely at the photo, you might notice that they've used the wrong "its" on their package, but let's forgive that and forge onward. 

Countertop soap dispensers come in either a top-filling variety, where you can pull off the pump and add soap from above, or the bottom-filling variety, where you have to clamber back into your sink cabinet and unscrew the bottle from below to refill it. Ours is a top-filling version, which is preferable, but this little doohickey does it one better. To install it, you do have to git all up in your cabinet (just this once) and unscrew the soap bottle from below. 

Then you take the pump off the dispenser and feed the Never-MT's plastic tube up through the hole. The toughest part is next, and that's jamming the plastic tube onto the other plastic tube attached to the pump. The kit tells you to soften the clear plastic tube with hot water for this step, and I found that very necessary. Also, my pump tube was covered in soap (dur), so I had to rinse that off really well and then hold both parts with dry paper towels to keep my hands from slipping. I eventually succeeded at getting an overlap somewhere near the suggested half inch. 

The kit comes with caps in four different sizes to fit whatever size soap bottle you have. This particular bottle is gross and we actually inherited it from the previous owner, who left it downstairs on the laundry sink. I will be purchasing a new one soon. It also just occurred to me that I could have just used the actual dispenser bottle on the right that the soap was already in. So way to go, me, for jumping that mental hurdle. 

Last step (for me anyway): Thread the remaining three caps onto the tube so you'll have them if you switch bottle sizes later, then stick the tube down into your soap bottle. Bam. The soap just chills out on the floor of your undersink cabinet, and you never have to mess with the undermounted bottle again, or guess at if you're filling the bottle enough from above. I plan on buying a big Amurican-sized bottle of soap at Costco and then forgetting about it for a year or so. The kit also gives you a Velcro strap that you can use to affix the bottle in place under the sink, but that didn't seem necessary to me. I'll update this if I later change my mind. I also left a towel wadded up in the cabinet underneath where the tubes meet, so if I didn't jam them together as securely as I thought and they come apart, I won't have a soggy mess. I'll double check tomorrow and then hopefully will feel confident enough to call it good.

So I guess I'm doing product endorsements now. The Never-MT is online here, and no, they do not have the most cutting edge web presence, but mine arrived in one week and no one has stolen my credit card info yet, so good enough. It's around $17 with shipping. Treat yo-self, or someone you know who has a countertop soap pump.


Thank you, obsessive ladies of GardenWeb!


Sunday, December 2, 2012

Yay.

You guys, I just spent 10 minutes trying to find a gif of Julie Andrews spinning on a mountaintop. I failed to find a version that would be appropriate for this, a family-safe blog, so please just picture that image in your head, because that is how I feel about the kitchen.

I haven't been the greatest at posting updates of each step. The last you saw, just the lower cabinets were in.

Then came the uppers. Then, skip ahead a zillion steps or so...

... now we have flooring, countertops, appliances and lighting, i.e., pretty much a FUNCTIONING KITCHEN, whaaatttt?! There are still a lot of odds and ends to be done (the hood, more electrical work, trim, and one of our cabinets needs to be swapped out because the shelf brackets don't align properly) but yeah, things are good. 
Total honesty, though: Eric was home when they installed the counters on Thursday, and he sent me this photo when I was at work and I had a quiet inner freakout and started questioning everything. It just all looked so foreign. Especially the new floor juxtaposed with the old. The new floor is cork, and we picked a dark color because we didn't want it to look like we had tried to match the old hardwood and failed. But this photo just looked so strange and off to me! Then I got home and saw it in person and it was fine. I think it just takes a few days (and seeing it in the flesh, not a photo) for your brain to adjust to changes like these.
The whole thing made me remember this post from Young House Love a couple weeks ago (yes, I will be referring to YHL pretty much constantly) about how "the middle makes no sense." Even now, the whole space looks very cool (as in not warm) but I keep telling myself that after we add paint, window treatments and accessories and actually start LIVING in the space it will all come together.

I think paint will go a long way toward unifying the two halves of the room. It will be a happy day when we get rid of this lime green. Soon the action will start on the other side of the room, where we're having a bench built in under the bay window (it's the law!) and a desk built in on the wall by the door. 

 Eric has a good friend who works for a stone distributor, so we actually got a bit of a hookup on our countertops. The granite we chose is called Coast Green, and it's in a honed finish instead of polished. It always looks more gray in photos than it does in person. 
We lived without an oven for four and a half months, so now we're overcompensating with TWO. I'm psyched about this thing. If you're just baking one thing the little oven on top preheats faster and is more energy efficient. Or if it's Thanksgiving and you need to do things at different temps, no more noodling around trying to figure out the best way to split the difference. Every time I've lived somewhere with an oven that has one of those bottom storage drawers, I put something like a muffin tin in there and then forget that drawer exists and six months later I'm like, "Where's that stupid muffin tin?" So now, no drawer. MOAR OVEN. 
When our contractor gave us the initial schedule that said they'd be done by mid-December I thought, pshyeahhh, right. Meanwhile it was determined that we'd host Christmas for my family, so I started preparing everyone for takeout from Buca di Beppo. But... like... this is real now! I have a Christmas dinner to plan!

Sunday, November 25, 2012

Oh (Possessed Elf) Christmas Tree

In 10 years of dorm and apartment living, I never had the space or the inclination to mess with a Christmas tree. But last Christmas finally seemed like the time to get one. We were still in the condo then, so we wanted something mini-sized. This year, although we finally have the space for something bigger, we're sticking with the same one. While it may be a little under-scaled for the living room, it's the right scale for our budget at the moment. I just put it up tonight and it makes me happy happy.

Here she is. It's a four-foot tall economy special from Target, and no, actually that is not a flaming pentagram on top. 
It's a vintage elf tree topper with crazy flashing lights. I went on a manic eBay search last year for the ideal tree topper, and when I came across this one there was just no question. (If you are similarly enthralled, search for "Pixie Circle of Light." They can usually be found for around $15.) 

Among Eric's many wonderful qualities is that when I seize on an idea like this, he is usually happy to go along for the ride. (See also: peacock gravel art.) I posted a picture of this guy on Facebook last year, and my friend Jess wrote, "That thing is going to come alive while you sleep." Alive with holiday spirit, amirite?!
 
My mom collects a dated bulb for every year, and last year she had this one made for us to start our own collection. My mom is swell.
Happy holidays, y'all! I hope your month ahead is filled with warmth and sanity.


Saturday, November 17, 2012

Cab-ra-cad-abra

We have reached the "dust is everywhere" stage of remodeling. I don't think I noticed it as much during the week because it's already dark when we get home from work now, but today when I saw the living room and rec room in natural light I was like, "Oh, okay, this is filthy." 

But I can't care too much about the dust because this makes it all worth it...

Primed drywall (we did that ourselves!) and new plywood on the floor (we did not do that ourselves).

Eh meh geh, cabinets! They started to install these yesterday and will finish next week with the uppers. It's definitely weird to see the island there since that's the biggest change in the layout and it's situated differently than the old peninsula. But I know we'll get used to it. Plus, when the counter is installed on the island it will have an overhang on the back, which will take up some more visual real estate and balance it a little. 
 
Here's the front side of the island. We may or may not have repeatedly opened and closed the drawers to play with the soft-close feature.

I don't think I've posted anything from this angle before. That's the door to the garage on the left, and the louvered door on the right leads into the living room. There's also a pantry closet in that little passageway but it's not part of the remodel, except for the light we're having installed above it. If I get real handy someday I might install slide-out shelves in it.

There's the latest. Next week they'll finish the cabinet installation and start on the floor. Originally they had planned to install the floor first, but then we chose a "floating" floor instead of a glue-down kind and apparently it's better to install that after cabinets. I'm just glad the plywood is down now to keep more debris from falling into the laundry room. 

I will leave you with a thrilling flooring preview:


Sunday, November 11, 2012

My Mod Fireplace Art Find

The peacock gravel art was not my only great find the day I went shopping with my mom. We also went to HomeGoods, where I stumbled across an ideal "art" piece for above our living room fireplace. Remember back when I wrote that I was looking for a vintage metal wall sculpture to hang in that space? Well, I was scouting eBay for a while and it started to sink in that I might not strike gold there. First, the space I was looking to fill was pretty large, so I ruled out a lot of the smaller pieces I found. But second, bidding is pretty competitive for those things! Most of the ones I saved in my watch list ended up going for well over $100. Yes, I understand that is actually a very low price in the art world, but we have a few other demands on our budget right now (we're on day 12 without a kitchen, not that anyone's counting) so there was no way I could justify spending that much on a purely esthetic element.

So, back to HomeGoods, where I found this:

How could I pass it up? Metal, large-scale, mod geometric lines, and $30! Total jackpot. The funny thing is this is actually a wine rack. Look, Target has one that's really similar. But that's just between us, okay? I fully plan on telling people that I found this in an exclusive art gallery called H. Güdes. Yes, there's an umlaut.
(Please disregard the boxes holding our kitchen light fixtures and the fact that the door is taped off with plastic.) We got lucky in that there was already a picture hanging doodad installed way up high on the fireplace surround. I definitely wanted to work with that instead of figuring out how to drill new holes in the metal and whether or not there was brick behind it all the way to the ceiling. So, I hung it up and it looked nice, but the black color wasn't quite doing it for me. I wanted it to pop a little more and coordinate better with the other metal tones. And that is why I decided to spray paint it. 
The spray painting took place on a drop cloth in the unfinished area of the basement. It was a little huff-tastic, but it is November in Minnesota, so doing this outdoors was not going to happen. See the little screw holes? I masked those off with painter's tape because I wasn't using them to hang it, and if these blend into the background a little that's just fine with me. Maybe someday if I get really strong wire shears I can snip them off but for now I'll just camouflage.

The tools: Krylon Metallic paint in Copper (which I found at Michael's) and  the Rust-Oleum Comfort Grip! I picked up the Comfort Grip at Home Depot prior to the vent painting project. I want to say it cost around $6, and I initially wondered if it would be useless, but it's totally not. If you're spray painting something for any length of time, this relieves finger cramps and helps you spray evenly.
A few coats later, bada-bing! It totally belongs there. 
See the black screw holes toward the bottom? You have to look reaaallly hard to spot them. 
I'll try to get a better picture tomorrow when we have some daylight. I still want to post some more shots of the rest of the art in the living room, but things are pretty disheveled in there with the kitchen stuff in the way. This is one big decor item checked off the list though, and for only $30. Or $36, if you count the cost of the spray paint. I'm pretty chuffed by this project!


Saturday, November 10, 2012

Bathroom Sprucing

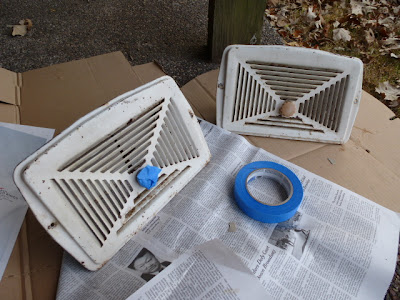
In news of other, smaller projects, a few weeks ago I took the vent covers off in both of the upstairs bathrooms because they were gross and rusty. 


retro vent covers
After taping off the plastic knobs, I went to town spray painting them. Everything I know about spray painting, I learned from Young House Love. Apparently the key is to do many thin coats and to always keep your arm moving. This is a partial explanation for why it took me two to three weeks to complete this simple project. I started outside and put a few coats on, then moved them inside to the unfinished area and put down dropcloths to do some more, and then I'd just forget about them for a few days, then check in and decide yep, they still needed more paint. 

Finally, two days ago I declared them done and put them back. But. Now that I look at how much more beige they are than the before photo, I'm not sure I love them. This may call for a re-do at some point, but they'll do for now. Definitely an improvement over the rust. Side note: Posting this photo really drives home to me how much I need to deep clean the grout in the bathroom. 

Additionally, re: the bathroom. My parents came for a visit two weeks ago and I took my mom to the antique shops in downtown Hopkins. Our stay there got cut short, but not before I found something that I had to take home with me. Will you like it? I don't know; do you like things that are fabulous?

peacock gravel art
It is a peacock made of aquarium gravel on black velvet and it's pretty much... the greatest?! No, actually, the greatest is what I paid for it, which was $11. Now some of you are scoffing that a person would pay anything for this, but I just made an amazing discovery of the exact same thing on eBay, in a pair, that is selling for $150! And there's actually a bid on it! Did they sell these in kits like paint-by-numbers or something?

Well you know this is going to spark a collection. Soon we'll be calling it the peacock bathroom. And I am not ashamed. 

Friday, November 9, 2012

Walls and Insulation and Ponies and Butterflies

I came home to find a strange man on stilts in my house today, but no biggie, he was just mudding drywall and now we have glorious new waaalllsss. Thank you, strange man on stilts!

I should back up. Before the drywall, they did electrical work and an inspection on that, then sprayed this lovely new insulation so it will no longer be freezing when you reach inside our cabinets. 
Here's a view of some of our new pot lights, as well as the hole in the ceiling where the ugly fixture used to be.

Now it's starting (just starting) to look like a room! The drywall process is actually moving faster than we'd anticipated. Since we told our contractor that we'd prime and paint on our own as a cost-saving measure, today he sent me an email to say that the walls would be ready for priming on Tuesday. Eep! I had not quite pieced together in my head how that workflow would go, but I guess it does make sense to do it now and avoid having to tape off all the cabinets, etc. But I don't think we'll be able to decide on a paint color without the other elements in the room (particularly the counter, which we don't have a sample of). So I may have to settle for just priming on Tuesday and do the actual painting the hard way after everything is installed. I have not yet run this idea by the contractor to check if that's idiotic.
 That's the latest! Things are really moving along. We actually breathed a big sigh of relief last week when the demo didn't uncover any tragic issues inside the walls. As previously stated, I watch way too much HGTV, so I had kind of steeled myself for a problem at that stage. Instead it's been swift progress. Hope I didn't jinx anything by saying that.

Monday, November 5, 2012

Making Do

Well, we're coming up on a week without a kitchen. Over the weekend, a few people asked me what our temporary setup is like, so I will tell you: It is messy, and yet to be perfected. I think we had pizza delivered on five of the past six days. But yesterday I went to the grocery store and I think we have some delicious sandwiches in our future.

The demo actually wasn't fully complete in my last post because the linoleum was still on the floor. Once they pulled that up, it occurred to me that I had failed to account for the fact that the gaps in the subfloor would allow a bunch of dust and cruddy crud shavings to fall through into the laundry room below. There's nothing to do about it really until the new floor goes down. Until then, I'm glad the laundry room is unfinished?

Here's a bit of our temporary kitchenette setup in the rec room. GLAMOUR. Hey, see that D-Con package on the book shelf? Funny story: After the discovery of all the mouse poop under the cabinet, I bought some poison, thinking it would just be precautionary during the winter, especially since we'd be eating downstairs more. The package said to move the bait if it hadn't been touched after three days, and I was all, "How would I know if a little mouse has a little nibble on it? How do you judge a thing like that?"

Turns out it's very easy because JERK MICE EAT ALMOST THE WHOLE PACKAGE. So yes, this is great news. We definitely have mice. My mom has also pointed out that poison not be the best way to go since then mice can die in your walls and be smelly. But I'm torn, because I've used traps in a past apartment (I'm not gross, I've just lived in a lot of old buildings) and come home to find a mouse trapped only by its hind leg, which left me to finish the job with the nearest heavy disposable thing. Ironically, from the mouse's point of view, it was a Lucky magazine. 

Tangential: The last time you saw the "fourth bedroom" it was filled with cardboard boxes. We've since cleared those out and moved the patio furniture in for the season. I'm now calling this room the salon. (You have to say it with a pretentious accent and emphasize the first syllable.) I'm not kidding myself that it will ever be used. Basically I just think it's funny. Even more tangential: I was born on this rug. It's a long story of a short labor, but the upshot is that my parents kept the rug in their garage for 30 years and then gave it to me once I finally had a place for it. In my mouse-infested salon. 

Anyway, I guess the plan is to just be really OCD about cleaning up food remnants in the basement and keeping anything tasty packed away in glass containers. Uhhh gross I hear something in the wall RIGHT NOWWWWW. I hope you have a massive tummy-ache, jerkwad. Please die outside.

Wednesday, October 31, 2012

Guess what? Kitchen gut.

The kitchen is gooooone! I took the day off and hung out in the basement while upstairs there were...

And now, what looked like this last night...

... now looks like this:
Hey, studs.

Hey, giant ziplock bag for my kitchen.

Gross discoveries along the way: 
What is this? It was screwed into the underside of one of the cabinets. And it is filthy. Which makes me think that it was heavily used at some point... but for what? Please comment if you know the answer to this mystery.
Additional gross things I did not get pictures of: So much mouse poop under one of the cabinets. Ugh. We haven't seen any evidence of mice since we've been here and the previous owner had two cats, so I'm guessing and hoping it was very old. 

Also, you know how you're supposed to clean the coils of your refrigerator periodically so it runs more efficiently? I had the chance to see the bottom of our fridge when the guys were moving it, and it was basically wearing an inch-thick sweater of dust and cat hair. I'm not kidding about the inch. Luckily I had the chance to vacuum that away before the fridge was stationed in its new home. 

Exactly where the old one was. There's probably a note on the blueprints for this place that says "ugly fridge goes here." I really do want to paint this a fun color, because why not, but that task is not high on the priority list at the moment. 

What is actually high on the list is putting the dining room back together, because this will not do:


The picture-hanging project is exactly where it was 10 days ago, except worse now because I piled a bunch of random kitchen stuff on the table. But today I seized the day and went out and purchased spackle, so now I just need to spackle the messed-up hole, touch up the paint and finish the hanging project, after which I can then use the credenza to hold the junk that the table is currently holding. 

Progress! Sweet demo-ing progress.